
Climate Battery Functions
The magic of phase change from liquid to vapor and back again drives the Climate Battery™, or Subterranean Heating and Cooling System (SHCS). The system functions like a simple refrigeration system, moving heat from one place to another. But a typical 1200 square foot greenhouse needs only the equivalent equipment and running costs of a single large household refrigerator!
By slowly circulating all of the hot, moist daytime air of the greenhouse down underground where it is always cooler than warm greenhouse air, the Climate Battery forces the vapor to condense. By doing so, the solar heat as well as the chemical heat from the plant photosynthesis that was required to evaporate the moisture in the first place is forced into the soil. The "miracle" is that by inducing temperature change over the phase change barrier we have the potential to harness far more of the energy normally the case if we simply tried to solar heat objects cluttering up your precious greenhouse floor space. And by inducing this "dewpoint" condition in the soil of the greenhouse, the plant roots are always being bathed in warm, moist conditions - the perfect balance for plants and solar greenhouses. The space is heated by the massive amount of radiating solar heat stored in the soil under the greenhouse, and with fans to circulate cooler nighttime greenhouse air through the tubing network, adding warmth and moisture back to the greenhouse.


Climate Battery Design
To use the Climate Battery Calculator, click here. Please note that the calculator was developed by John Cruickshank, who is no longer with us, and we have developed improved metrics for battery performance, which are discussed below.
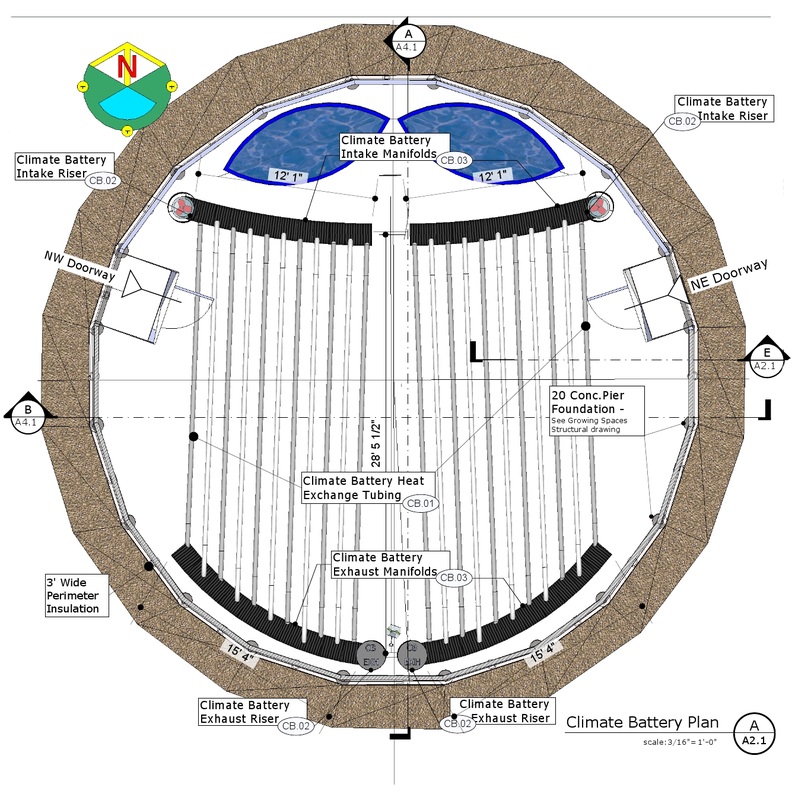
Here are some basic parameters we use for designing a climate battery:
0: Determine if the soil you will excavate for the climate battery and use to backfill the tubing is NOT "greasy", "elastic" or "sticky clay", because this type of soil inhibits the distribution of moisture into the soil matrix. It is better used for making pottery, building a rammed earth wall or lining a pond to hold water, and should either be replaced with a sandy loam free-draining topsoil, or one should use raised bed climate batteries.
1: Calculate the volume of space in your greenhouse (cubic feet or meters);
2: Select a fan (or series of fans) to push all of the greenhouse air volume through the climate battery at least 5 times per hour for slow heating, and up to 15 times per hour for cooling, with a fan speed controller for seasonal adjustments;
3: Calculate the number of tubes you will need to bury, such that a calculation of the air speed in the tubes is a minimum of 5 feet (1.5 meters) per second for heating stages, and a maximum of 15 feet (4+ meters) per second for cooling. Flexible perforated drainage tubing comes in 4" and 6" diameter sizes.
4: Lay out your tubing so that the tube lengths are at least 25' long (7.5m) and no more than 35' long (10.5m), so that the warm air is traveling in the heat-exchange tubes for at least 2-3 seconds before exiting the tubes and transiting to the exhaust port.
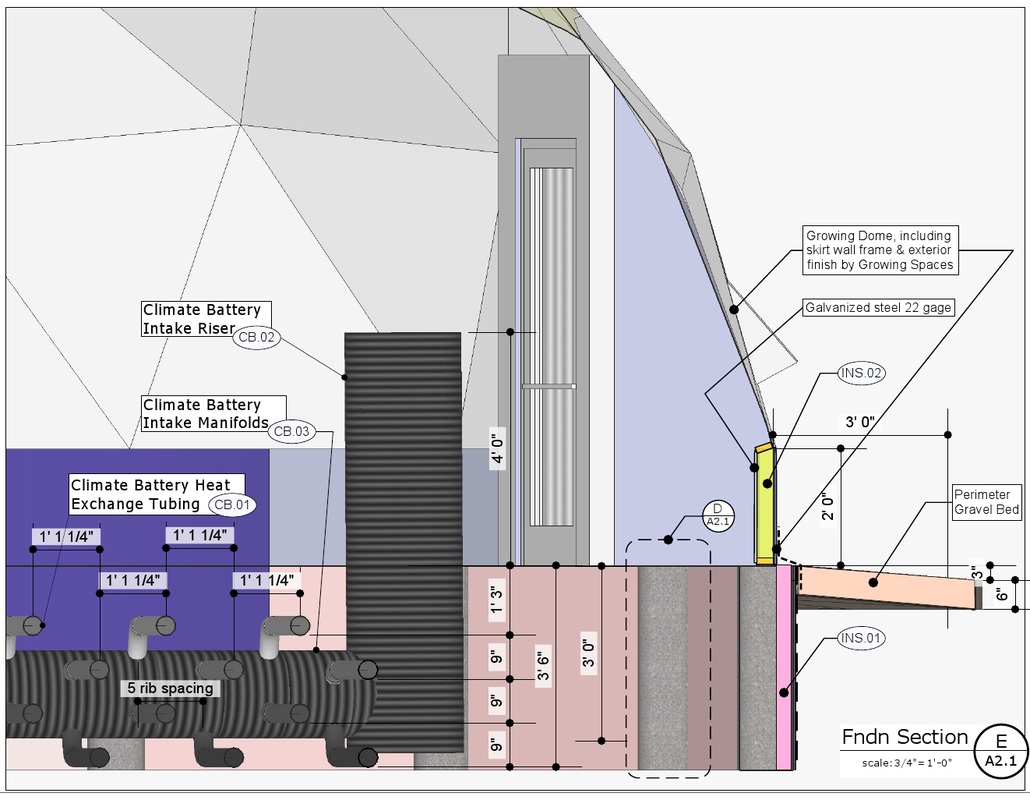
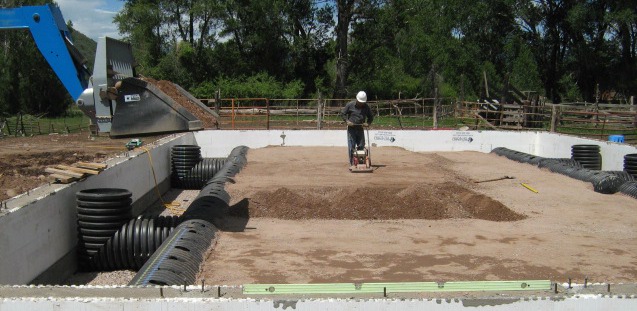
5: Bury your tubes so that at least 12 inches (30 cm) of soil is covering the top layer, and so that from the bottom of one tubing layer to the bottom of the next layer, you have a minimum of 2 x the tubing diameter, so a 4" diameter tube will have a minimum of 8" of cover, before the next layer is placed (more is better).
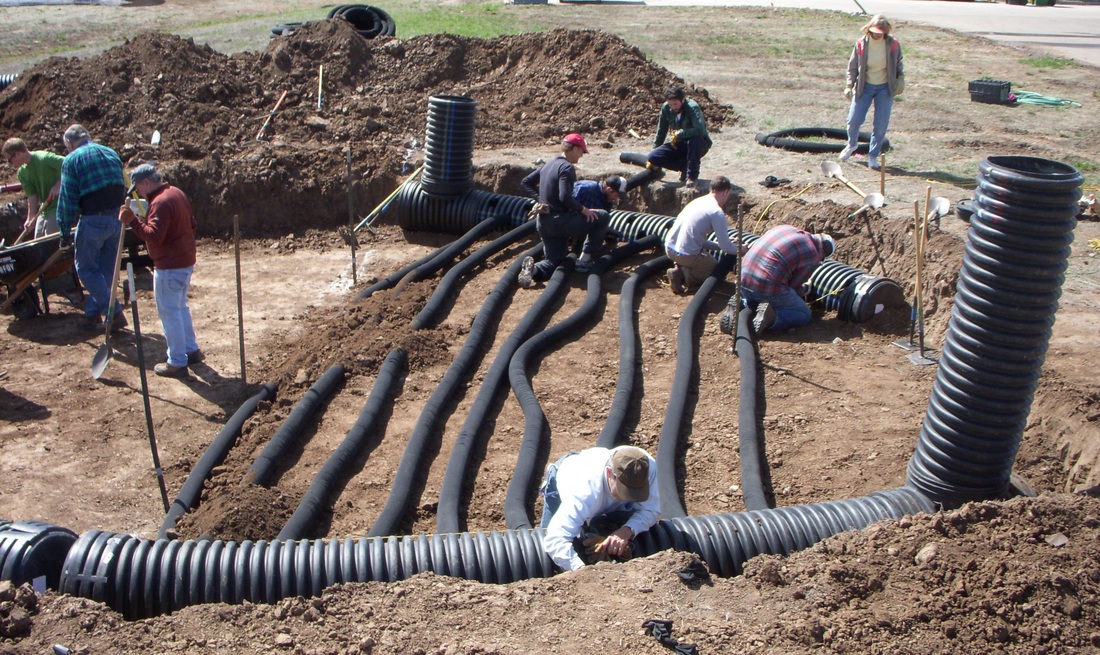
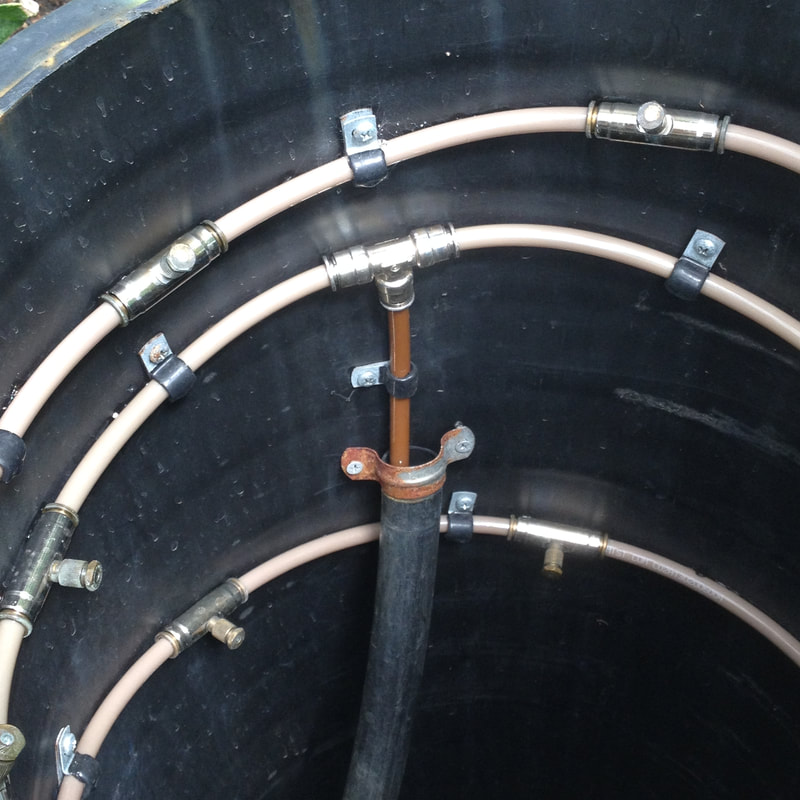
6: We use buried manifolds to connect all the tubes together at either end, and connect these to vertical risers as a means of laying everything out efficiently, though for a smaller greenhouse, you could gather all the ends of the tubing together in a fan box or barrel, and lay them out evenly across the greenhouse footprint. If you are using ADS corrugated culvert pipe for manifolds, as shown above, you will locate the holes for heat exchange tubing centered on the top of a rib as shown above, and space them apart at intervals of 3 - 4 ribs, and stagger these holes in different layers.
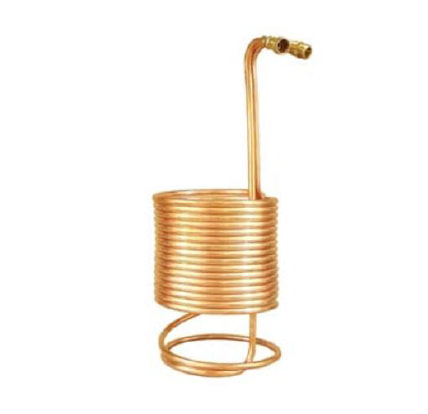
7: If your climate battery has vertical risers for the intake and exhaust sides of the battery, like you see in the above photos, you can install a copper coil inside the exhaust riser, which you could heat with a wood-fired boiler or a hot water solar panel. If this is installed with sufficient air flow around the coil, the climate battery exhaust air temp will be heated significantly as it re-enters the greenhouse space. For example, the greenhouse may go down to 40°F when the outdoor temp drops into the single-digits for long periods, and pumping air at this temp through soil that is at 60°, we will gradually chill that soil below 50°. Adding a hot water coil into the exhaust port would add another 10°-15° to the exhaust, providing a level of backup heat that may be all you need. A similar method may be used for backup cooling in summer. If you have a dry climate (RH = 50% or lower), you can install a misting system into the exhaust port, which will deliver evaporative cooling into the greenhouse. This works less well with a high humidity level of around 75%+, because you can't add more humidity to air that is already saturated. Otherwise, if you have a cold water source, such as running your outside irrigation water through the coil before it goes out to the garden, you may be able to chill your summer greenhouse a bit further.
8: For those growing in a Zone 8+, you may benefit from using raised beds with independent "bed batteries" and "row covers", to make a sort of "greenhouse within a greenhouse" to help with insulation against cool nights.
You can see examples of these principles at work in the photos above. The corrugated nature of the heat-exchange tubing we use helps to cause turbulence, so if you must use smooth-surfaced tubing in the ground, it is best to introduce some turbulence by curving, or introducing waves into the tubing layout, to get the air to release more of its heat and humidity into the soil. The tubing must be perforated as frequently as possible to maximize the exchange of heat and humidity, so you should select tubing with maximum density of perforations.
These are the simple principles behind the battery. In our experience, every climate battery is different, because we use it in combination with other energy storage features in any greenhouse, and there are many other principles at work, such as proper orientation on site, insulation of all the non solar harvesting surfaces, insulating curtains, etc. The performance of each greenhouse is dependent on all these factors and more. It's not like another product you can buy in the marketplace, like a car from which you will expect precise performance as promised by the manufacturer, because the performance of a climate battery greenhouse is dependent on the climate characteristics of its site and the experience level of its manager.
To use the Climate Battery Calculator, click here. Please note that the calculator was developed by John Cruickshank, who is no longer with us, and we have developed improved metrics for battery performance, which are discussed below.
Here are some basic parameters we use for designing a climate battery:
0: Determine if the soil you will excavate for the climate battery and use to backfill the tubing is NOT "greasy", "elastic" or "sticky clay", because this type of soil inhibits the distribution of moisture into the soil matrix. It is better used for making pottery, building a rammed earth wall or lining a pond to hold water, and should either be replaced with a sandy loam free-draining topsoil, or one should use raised bed climate batteries.
1: Calculate the volume of space in your greenhouse (cubic feet or meters);
2: Select a fan (or series of fans) to push all of the greenhouse air volume through the climate battery at least 5 times per hour for slow heating, and up to 15 times per hour for cooling, with a fan speed controller for seasonal adjustments;
3: Calculate the number of tubes you will need to bury, such that a calculation of the air speed in the tubes is a minimum of 5 feet (1.5 meters) per second for heating stages, and a maximum of 15 feet (4+ meters) per second for cooling. Flexible perforated drainage tubing comes in 4" and 6" diameter sizes.
4: Lay out your tubing so that the tube lengths are at least 25' long (7.5m) and no more than 35' long (10.5m), so that the warm air is traveling in the heat-exchange tubes for at least 2-3 seconds before exiting the tubes and transiting to the exhaust port.
5: Bury your tubes so that at least 12 inches (30 cm) of soil is covering the top layer, and so that from the bottom of one tubing layer to the bottom of the next layer, you have a minimum of 2 x the tubing diameter, so a 4" diameter tube will have a minimum of 8" of cover, before the next layer is placed (more is better).
6: We use buried manifolds to connect all the tubes together at either end, and connect these to vertical risers as a means of laying everything out efficiently, though for a smaller greenhouse, you could gather all the ends of the tubing together in a fan box or barrel, and lay them out evenly across the greenhouse footprint. If you are using ADS corrugated culvert pipe for manifolds, as shown above, you will locate the holes for heat exchange tubing centered on the top of a rib as shown above, and space them apart at intervals of 3 - 4 ribs, and stagger these holes in different layers.
7: If your climate battery has vertical risers for the intake and exhaust sides of the battery, like you see in the above photos, you can install a copper coil inside the exhaust riser, which you could heat with a wood-fired boiler or a hot water solar panel. If this is installed with sufficient air flow around the coil, the climate battery exhaust air temp will be heated significantly as it re-enters the greenhouse space. For example, the greenhouse may go down to 40°F when the outdoor temp drops into the single-digits for long periods, and pumping air at this temp through soil that is at 60°, we will gradually chill that soil below 50°. Adding a hot water coil into the exhaust port would add another 10°-15° to the exhaust, providing a level of backup heat that may be all you need. A similar method may be used for backup cooling in summer. If you have a dry climate (RH = 50% or lower), you can install a misting system into the exhaust port, which will deliver evaporative cooling into the greenhouse. This works less well with a high humidity level of around 75%+, because you can't add more humidity to air that is already saturated. Otherwise, if you have a cold water source, such as running your outside irrigation water through the coil before it goes out to the garden, you may be able to chill your summer greenhouse a bit further.
8: For those growing in a Zone 8+, you may benefit from using raised beds with independent "bed batteries" and "row covers", to make a sort of "greenhouse within a greenhouse" to help with insulation against cool nights.
You can see examples of these principles at work in the photos above. The corrugated nature of the heat-exchange tubing we use helps to cause turbulence, so if you must use smooth-surfaced tubing in the ground, it is best to introduce some turbulence by curving, or introducing waves into the tubing layout, to get the air to release more of its heat and humidity into the soil. The tubing must be perforated as frequently as possible to maximize the exchange of heat and humidity, so you should select tubing with maximum density of perforations.
These are the simple principles behind the battery. In our experience, every climate battery is different, because we use it in combination with other energy storage features in any greenhouse, and there are many other principles at work, such as proper orientation on site, insulation of all the non solar harvesting surfaces, insulating curtains, etc. The performance of each greenhouse is dependent on all these factors and more. It's not like another product you can buy in the marketplace, like a car from which you will expect precise performance as promised by the manufacturer, because the performance of a climate battery greenhouse is dependent on the climate characteristics of its site and the experience level of its manager.
Climate Battery Operation
Here are instructions for achieving good results with your climate battery (temps shown in Fahrenheit):
1: Daytime charging, or cooling stage #1: Run the battery during the day when you have an ambient temperature of 80°+ in the greenhouse during colder months, or 70°+ during warmer months, and monitor the temperature at the intake and exhaust ports. When your vents are sufficient to cool the greenhouse during the spring and summer, there is no need to run the battery for cooling. As you approach winter in the last few months of autumn, it is essential to charge the battery with warm daytime air, trying to reach an exhaust port temp of 70°+, as we enter winter time.
2: Use the battery as heating stage #1 in the greenhouse at night, only after the exhaust port air temp has risen above 60 - 65°F, the higher the better, for a good "charge". With a properly controlled battery in a well-insulated greenhouse, we usually see exhaust port temps above 60 all winter long.
3: The climate battery is a passive heat storage mass, that we can actively charge and discharge with fans. Since this mass does radiate heat and evaporate humidity stored in it, even when the climate battery fans are off, we can have a larger temperature span between cooling and heating stages during the winter. Daytime cooling may begin at 75 - 80° in winter, and heating stage #1 may start when the indoor temperature drops to 50°F, for a 25 - 30° "quiet gap".
4: Humidity is very important, so we encourage the recording of relative humidity (RH) as well as temperature. You should be experiencing RH levels inside the greenhouse of more than 45 - 50% in Winter, for the battery to charge properly. If it is less than this level, you should introduce humidity to the air in your greenhouse, usually by running a misting system.
5: Monitor temperature and humidity in two places in the greenhouse, at the intake port and the exhaust port, and a third location in a shady place outside, three times daily:
a: Early morning, or as close to dawn as possible, the coldest time of night;
b: Midday, or the hottest time of day, noting whether it is sunny or cloudy outside;
c: Evening, a few hours after sunset;
6: Once you are seeing exhaust port air temps above 60°, adjust the climate battery fan speed to maximize the Delta-T and Delta-RH between intake and exhaust port air. Usually, this means that when we are charging the battery, we need to run the fan speed a little lower, to allow the air more time in the tubes to release its energy into the soil, verified by a larger difference in temp and humidity across the air ports.